
How to create an AI-powered Slack bot
• 13 min read
Introduction
Imagine working in a vast organization with thousands of employees scattered across several continents around the globe. Do you recall the challenges you faced when onboarding a new team member, or perhaps when you joined such a company yourself? You’re added to the company’s Slack workspace, only to be overwhelmed by hundreds of channels and thousands of users. So, how do you navigate this complex landscape? The answer is simple – an AI-powered Slack bot.
You’re likely familiar with ChatGPT, but what if you could integrate ChatGPT into your Slack workspace and transform it into a dedicated company assistant, available around the clock? In this guide, I’ll show you how to achieve just that.
Setup and preparation
Our Slack app will be powered by Bolt for JavaScript and OpenAI, with the backend part deployed to Heroku. I guess, it goes without saying – you will need to be an admin of a Slack workspace to deploy the app and you need to have a Heroku and an OpenAI account.
Installing Heroku CLI
Now that we’ve got the “disclaimer” out of the way, let’s begin by installing the Heroku CLI on our computer (Mac):
brew tap heroku/brew && brew install herokuFor Ubuntu users, use this command instead:
sudo snap install --classic herokuFor other operating systems, refer to the official Heroku documentation.
Once the Heroku CLI is installed, log in with your Heroku credentials:
heroku loginAnd create a new app:
heroku createTake note of your app ID, as we’ll need them in the next steps. Above, stark-brushlands-55983 is the Heroku app ID.
If you prefer to create and set up the app via Heroku dashboard, it’s totally fine as well.
Git repositories
Next, initialize your Git repository. You can choose between using Heroku Git or hosting your project on GitHub and deploying from there.
Option 1: Using Heroku Git
To use Heroku Git, run the following commands:
cd my-project/
git init
heroku git:remote -a stark-brushlands-55983
Replace stark-brushlands-55983 with your own Heroku app ID.
Option 2: Using GitHub
Personally, I prefer keeping all my projects on GitHub and auto deploying from there instead. I’ve created a public repo, where you can view the source code for the project.
Then, you can link this repository to your Heroku project, by opening up the app we’ve just created in the Heroku dashboard, navigating to the Deploy section and linking the GitHub repository, which looks something like this:
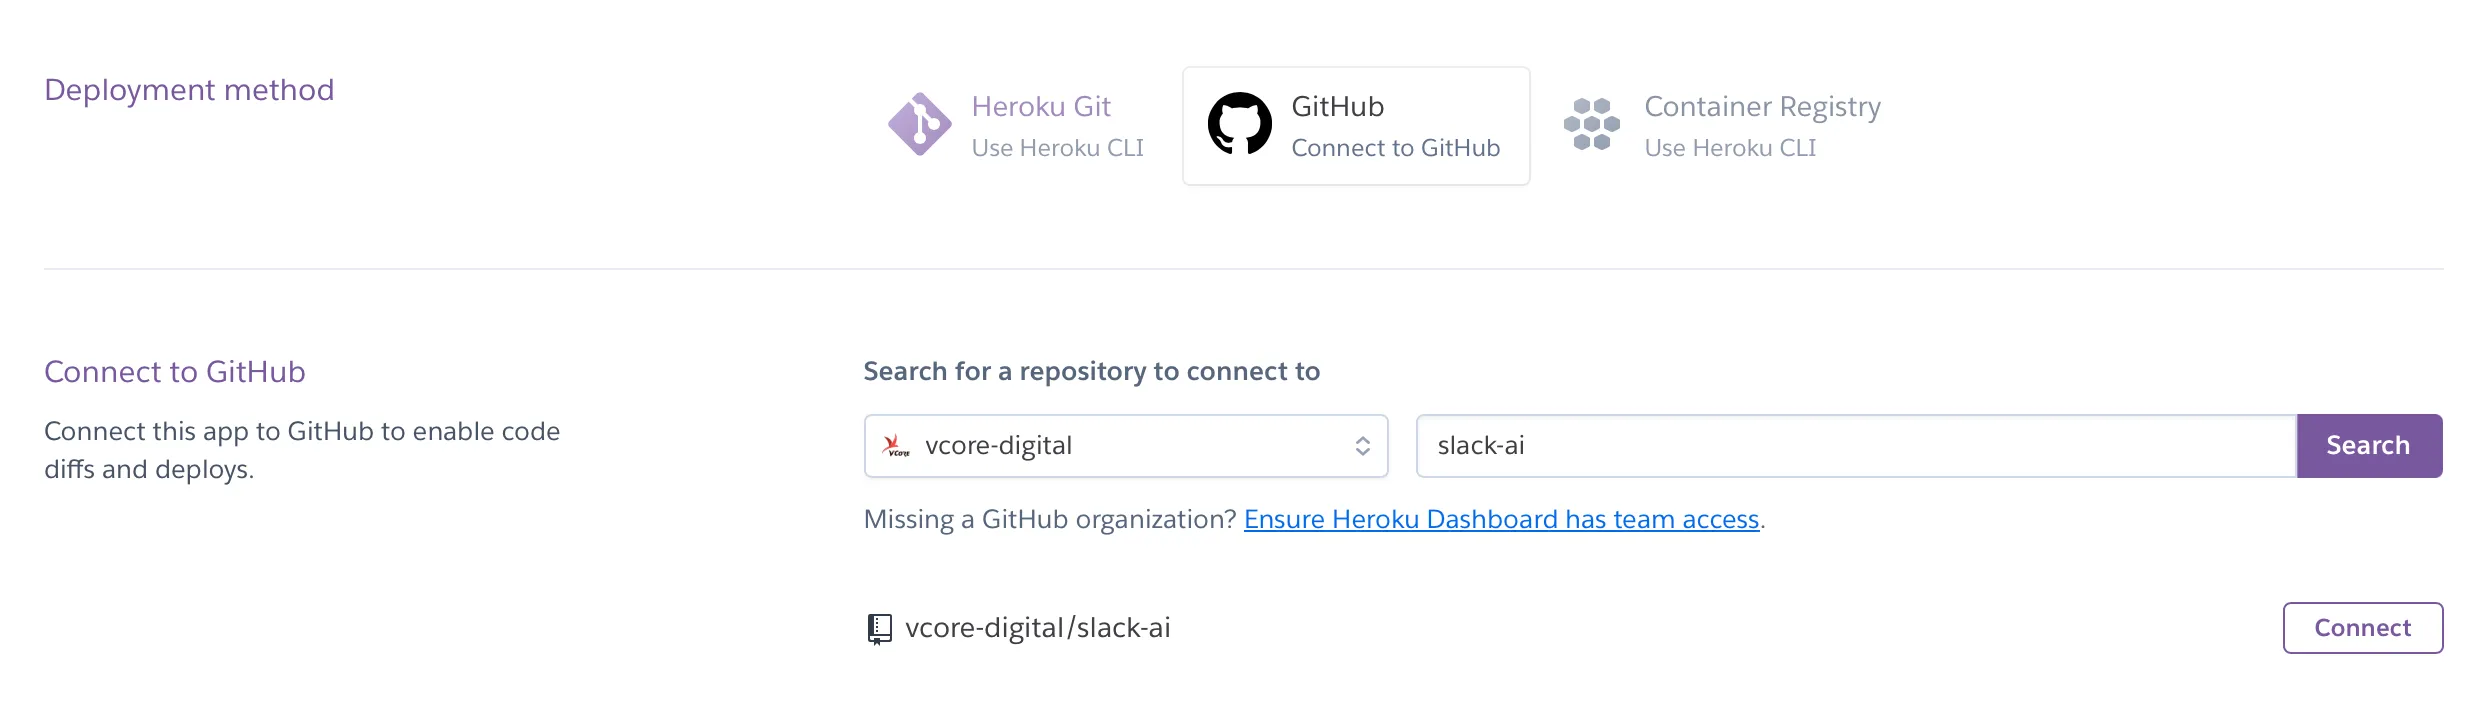
If your GitHub repository isn’t initialized yet, Heroku might not offer the option to set up automatic deploys. In this case, proceed with the next steps and, after executing the first git push command, make sure to enable automatic deploys for seamless synchronization between your Git changes and your Heroku app. If you are using the Heroku Git, this step is not required.
Creating the Slack app
Time to create our Slack app.
There are several ways to do this:
From scratch
Use the Slack configuration UI to manually add basic info, scopes, settings, & features to your app.
From an app manifest
Use a manifest file to add your app’s basic info, scopes, settings & features to your app.
We’re going to be building from scratch, because it’s the first item in the list, which means it’s the best option. Just kidding, the manifest option is in beta, so we’re going with the safe and proven option.
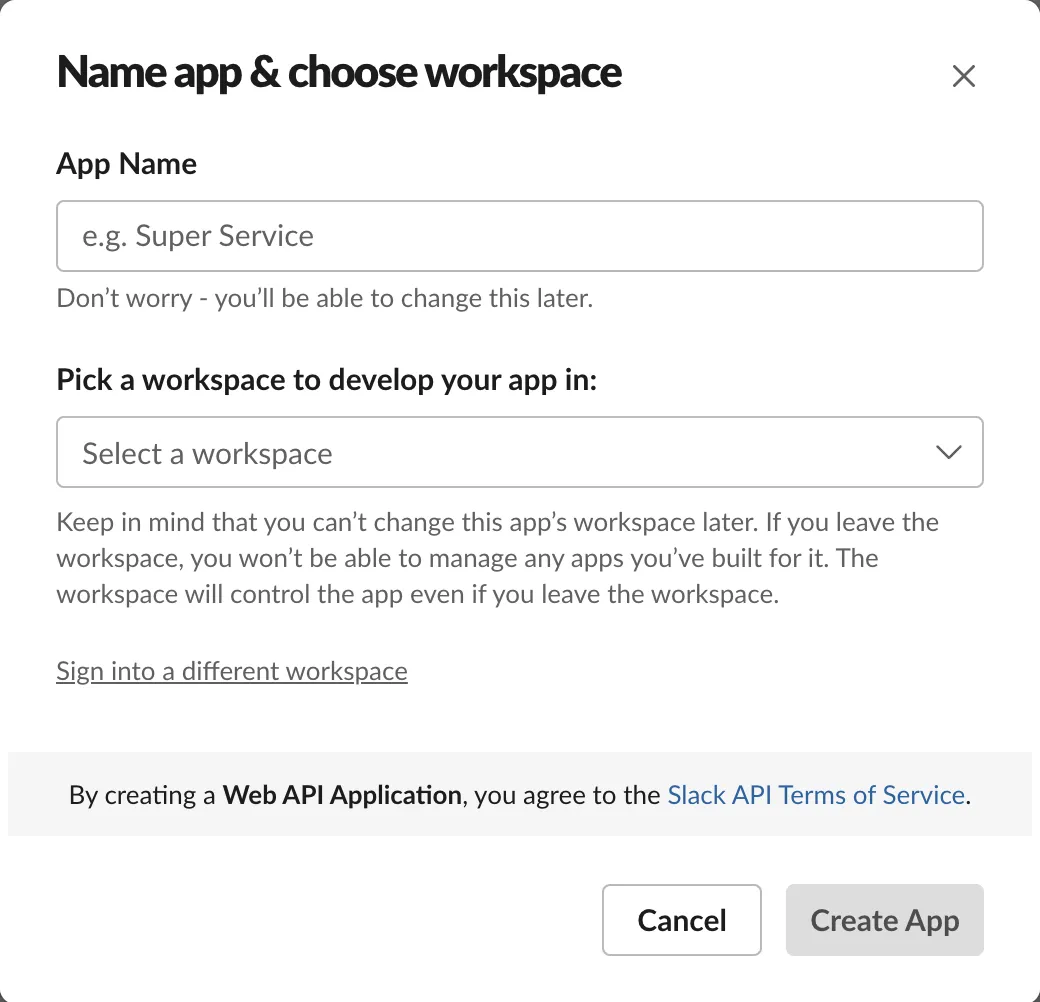
App Name can be anything (I have set it to AI Companion), this is what users will see, when adding the app in Slack. It can be changed later on. Workspace – which organization the app is going to be linked to (once set, cannot be changed).
Permissions
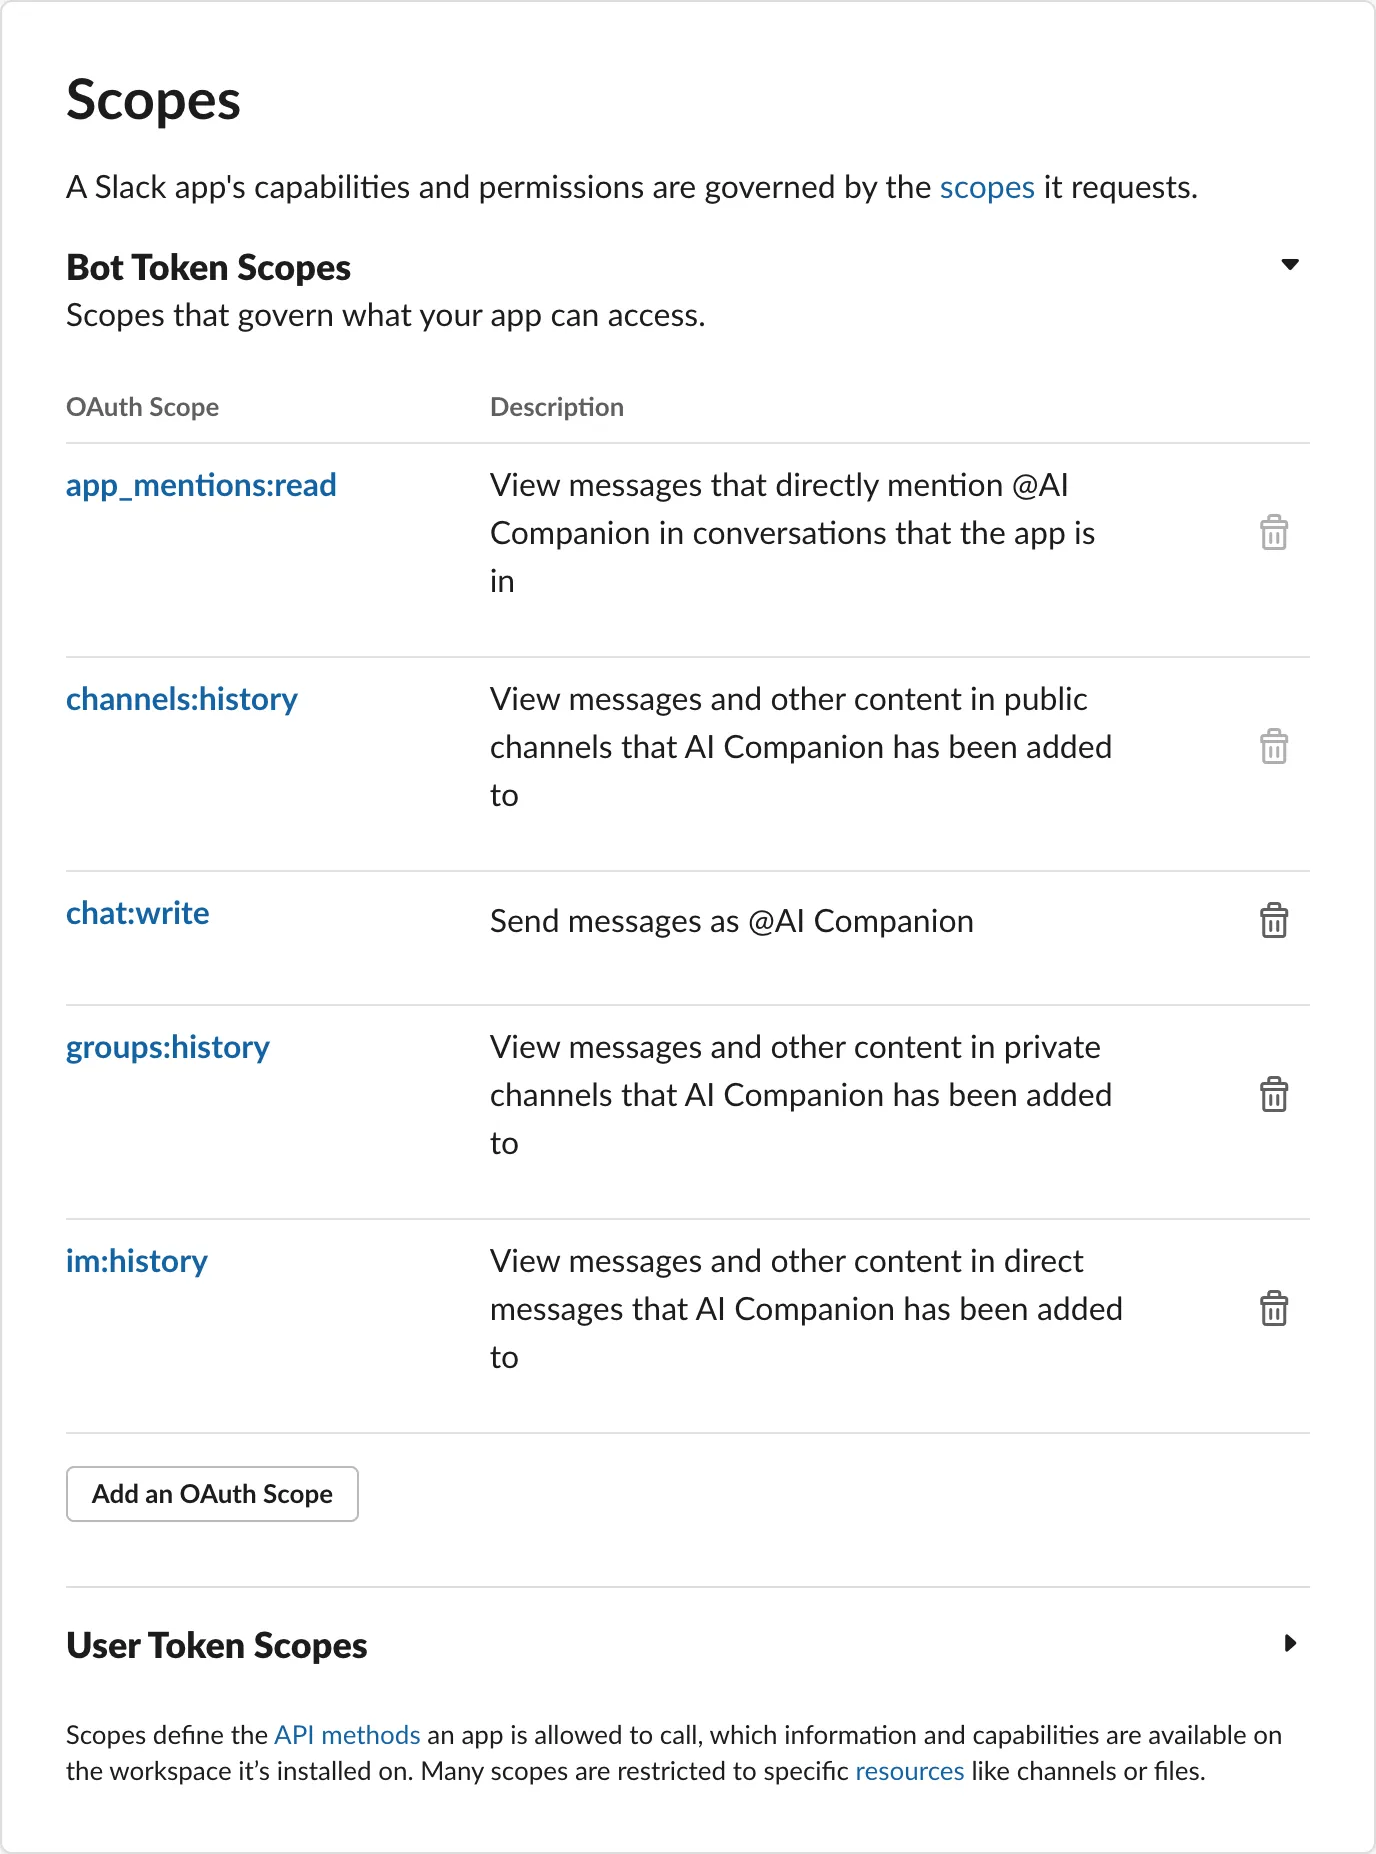
For the application to be able to communicate with us in Slack, it needs proper permissions. Let’s go to Features - OAuth & Permissions and set those up in the Scopes section. There are two types of scopes:
Bot Token Scopes – what the bot can do on it’s own from the “bot” account.
User Token Scopes – what the bot can do on behalf of the user.
For example, the chat:write permission that we are looking for will allow either sending messages from our app (bot token scope) or send messages on the user’s behalf (user token scope).
For this tutorial we will be using the bot token scopes, because we want the bot to act as a companion (we don’t want it to replace us… or do we?). This is what our Scopes section should look like after adding the necessary permissions:
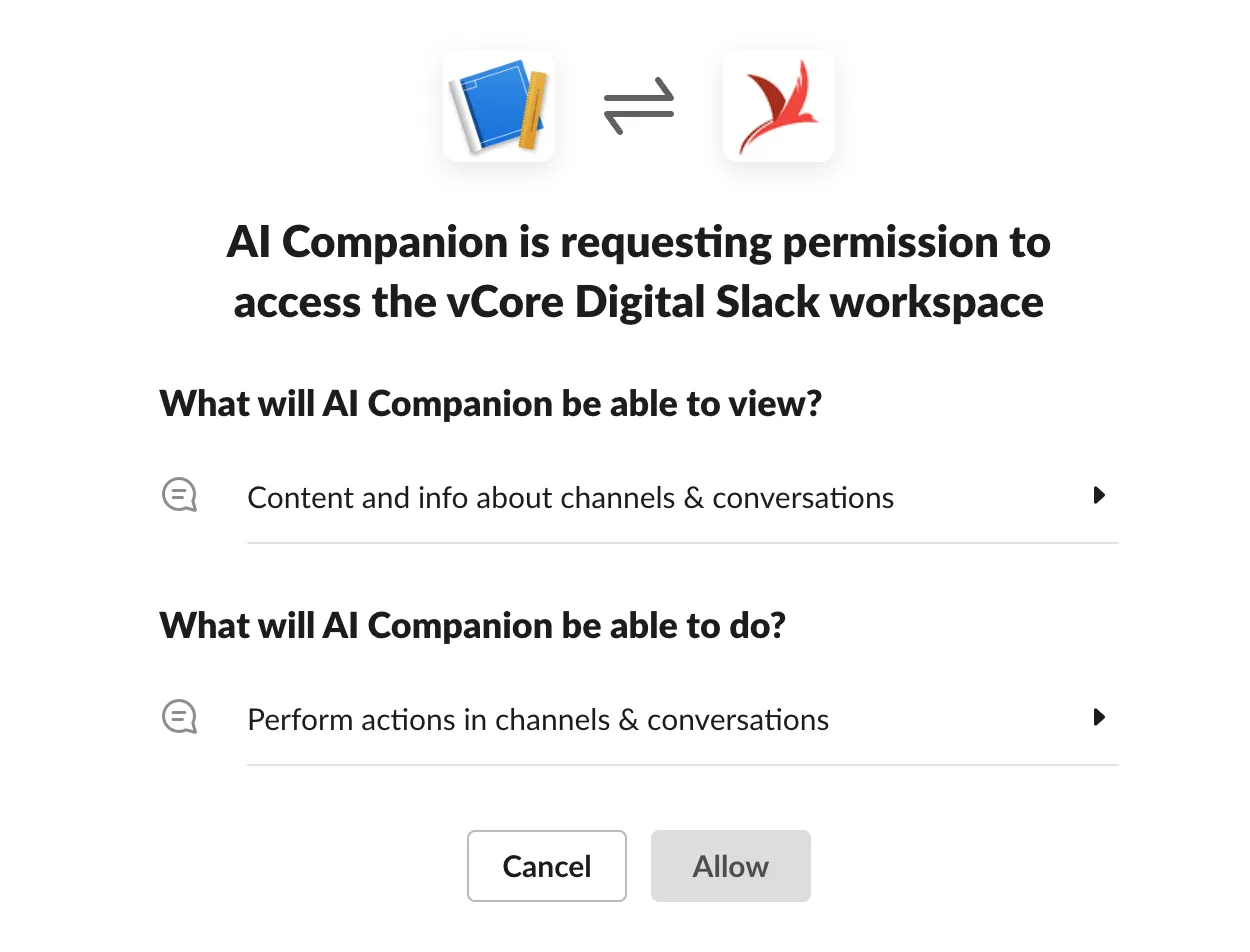
When the OAuth scopes have been defined, it’s time to deploy the app to our workspace and generate required OAuth tokens. This can be done by clicking on the Install to Workspace button at the top of the page, where we’ve added the scopes.
After clicking the button, confirm the action:
Once the application has been added to the workspace, you will see the Bot User OAuth Token. Let’s add this to our Heroku config variables:
heroku config:set SLACK_BOT_TOKEN=xoxb-<oauth-token> -a stark-brushlands-55983Again, if you’re not familiar with Heroku CLI, all this can be done via the Heroku dashboard on the app Settings page via Config Vars settings.
Socket mode
To use use socket mode we need to first generate an App Token and give it necessary permissions. Navigate to Settings - Basic Information, scroll down to the App-Level Tokens section and add a new token:
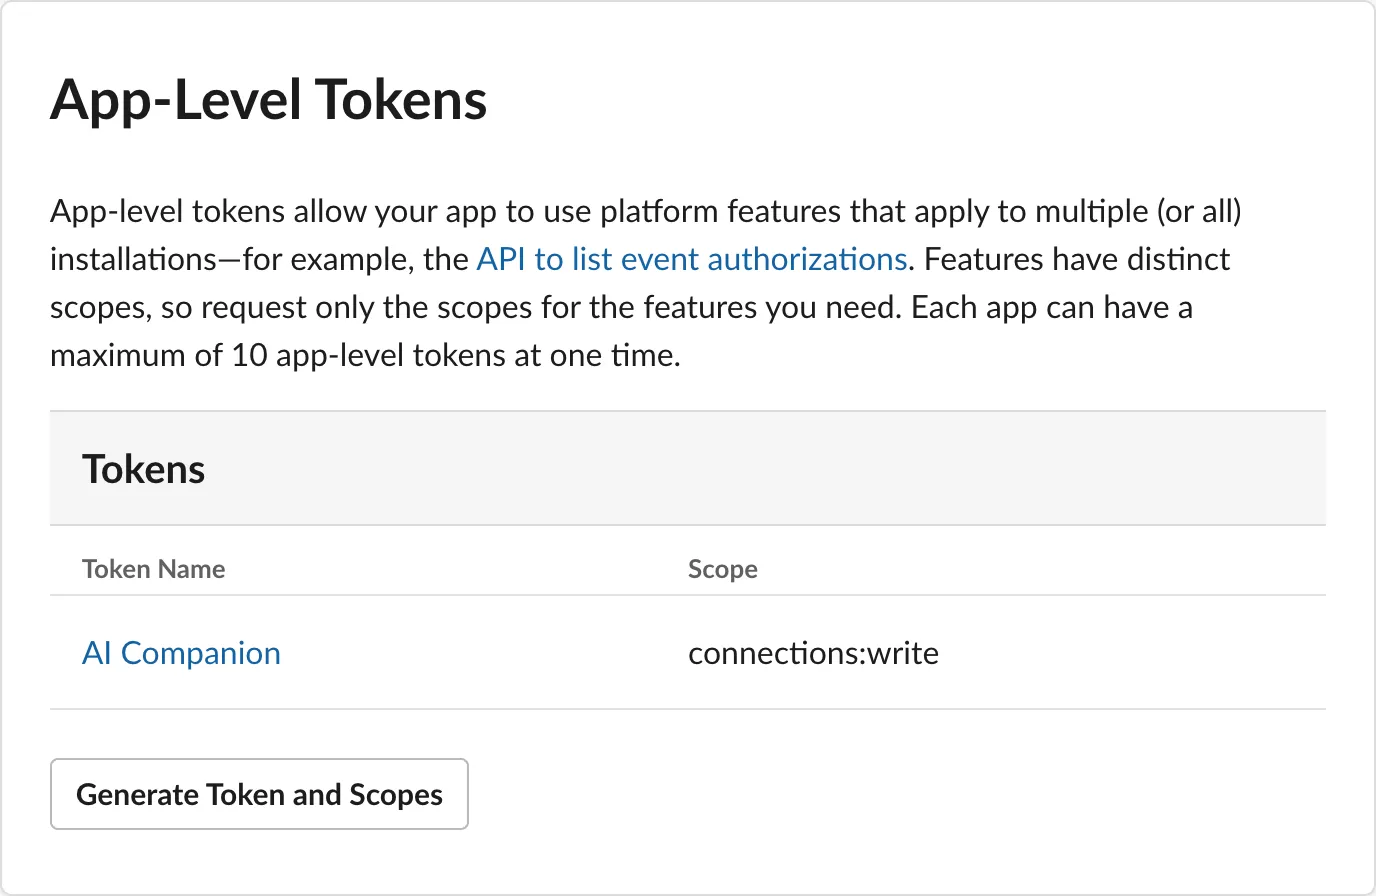
Add it to Heroku:
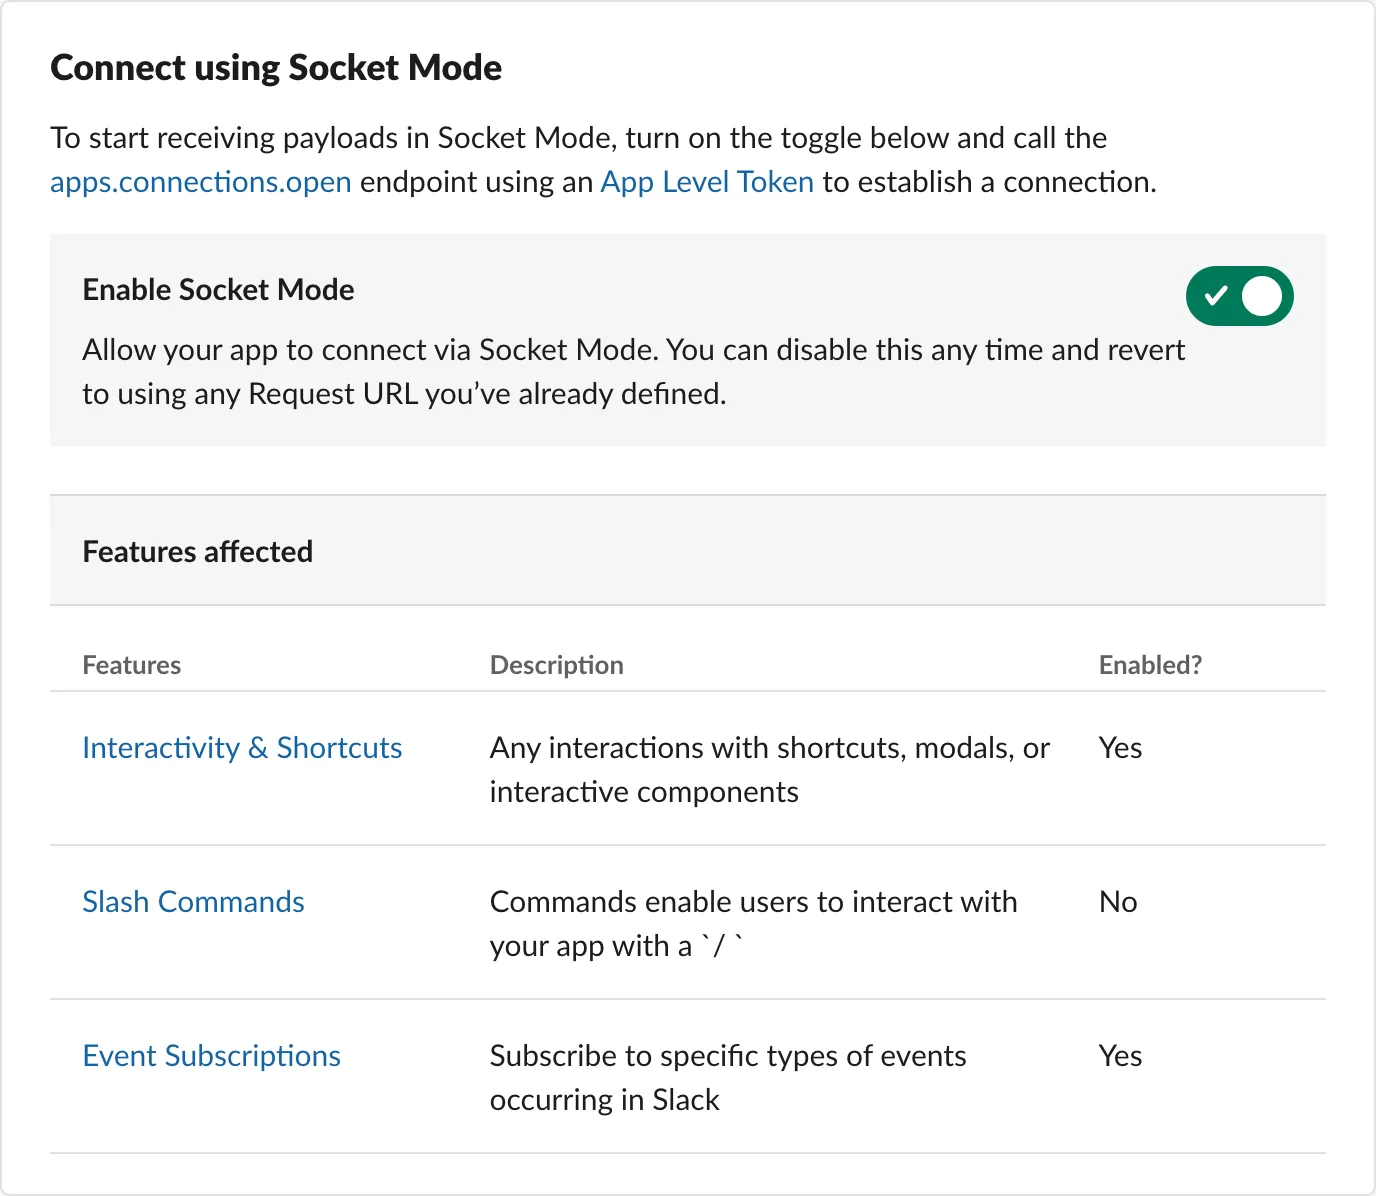
heroku config:set SLACK_APP_TOKEN=xapp-<app-token> -a stark-brushlands-55983Now we can go to Settings - Socket Mode and enable it:
Event subscriptions
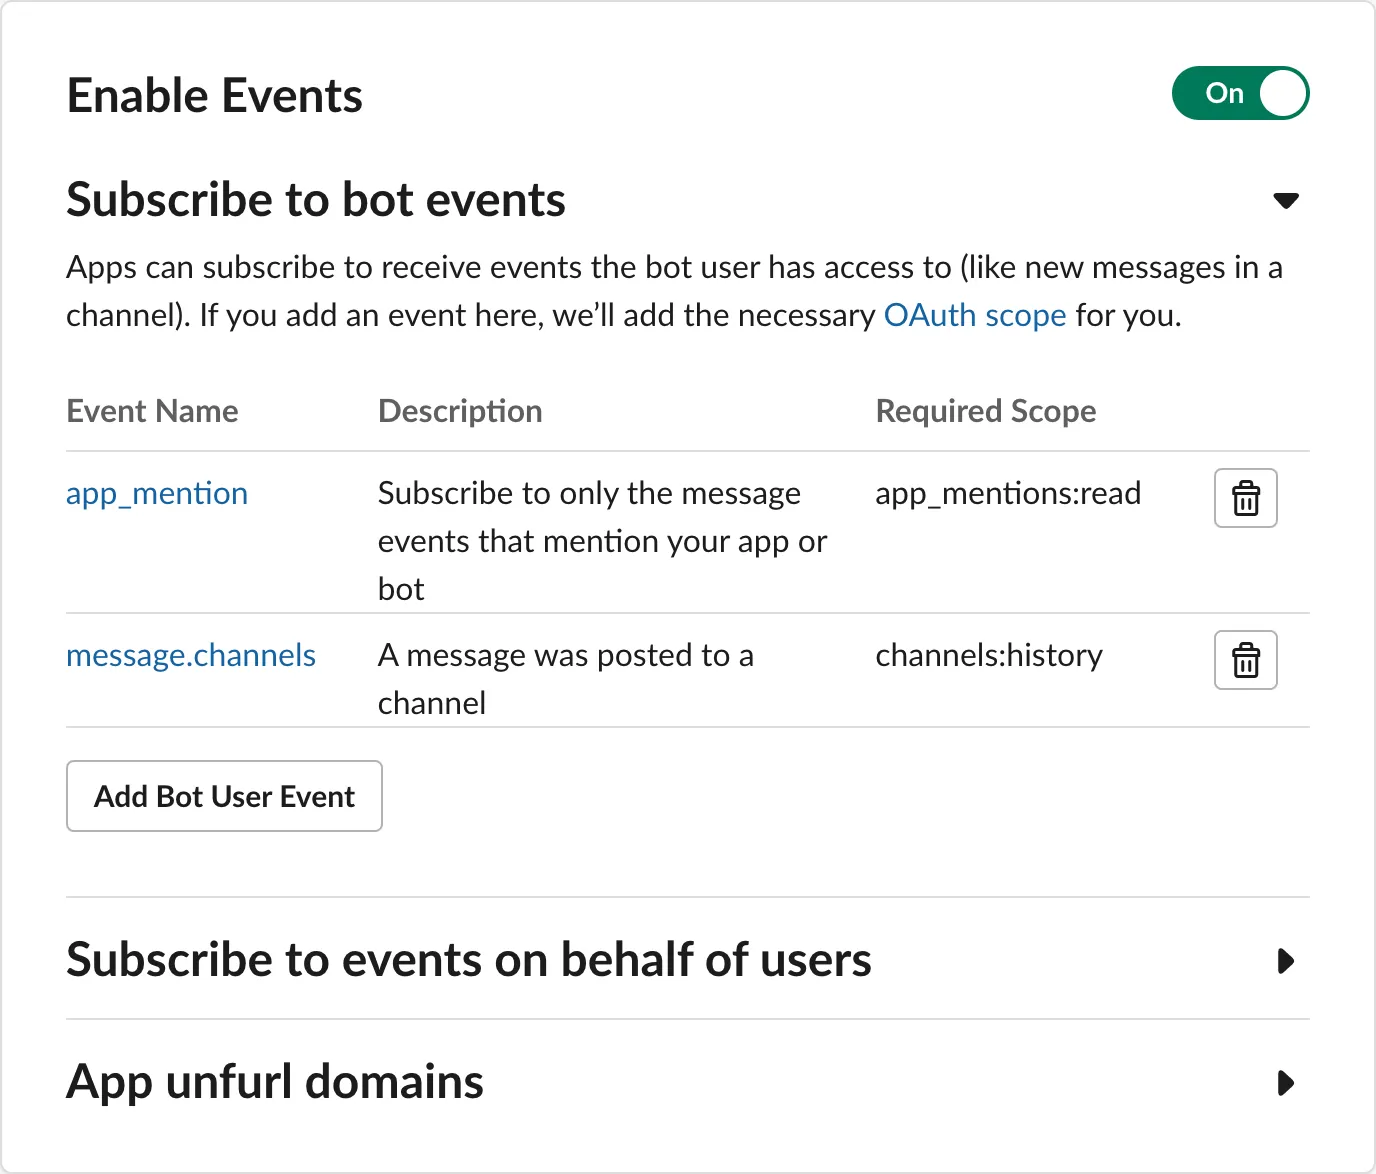
Events allow your app to be notified of, you guessed it, events in Slack (for example, when a user adds a reaction or creates a file). Navigate to the Features - Events Subscriptions section and enable the events. Make sure that app_mention and message.channels have been added to the bot events list:
With these steps completed, you’re ready to start developing your Slack app powered by Bolt for JavaScript and OpenAI.
App development
Packages and git
First thing, we need to install the Bolt SDK and the OpenAI library. Make sure you are in the correct directory, which is linked to the git repo.
npm init
npm install @slack/bolt openai
The first command is going to ask a bunch of questions, like how to name your package, keywords, description, etc. Leaving defaults for everything is perfectly fine. However, we will need to edit the package.json file and add the start script, so the scripts section should look something like this:
"scripts": {
  "start": "node index.js",
  "test": "echo \"Error: no test specified\" && exit 1"
},
Next, we need to create a .gitignore file, which will allow us to define which files and directories should not be synced with git. For example, we do not need to sync up large node_modules directory, that will be created each time we deploy to Heroku.
The bare minimum of .gitignore:
node_modules/
package-lock.json
.env
You will probably want to add stuff, related to your setup. However, after the above steps, the git status command should return the following:
# git status
On branch master

No commits yet

Untracked files:
  (use "git add <file>..." to include in what will be committed)
	.gitignore
	package.json
Note, the only two files .gitignore and package.json. Let’s commit those to our repository:
git add -A
git commit -m "Setup project"
git push
Excellent. By this stage we should have a proper sync between our git repository and Heroku app, if we haven’t set up automatic deploys in the previous step, now is a good time to do it.
However, Heroku does not yet know what to do with our files. In order to tell it what type of app to set up, we need to create a Procfile with the following content:
worker: node index.jsBecause we will be using sockets, we need to use a worker to run our script, otherwise Heroku will show a fatal error, because the app did not mount to any port.
And let’s also create a boilerplate index.js file:
const { App } = require("@slack/bolt");

const app = new App({
  token: process.env.SLACK_BOT_TOKEN,
  appToken: process.env.SLACK_APP_TOKEN,
  socketMode: true,
});

(async () => {
  await app.start();
  console.log('⚡️ Bolt app started');
})();
Commit the changes to git:
git add -A
git commit -m "Add Procfile and index.js"
git push
Sometimes, it might be required to activate the worker in Heroku. So log in to the dashboard, go to you app Resources tab and make sure that your dynos are set up in the following way:

Coding
In this section, we’ll implement the logic for our Slack bot, which involves the following steps:
- Listen for mentions on Slack;
- Once someone mentions our bot, the bot will take the message from the user, send it to OpenAI (kind of like if you were to write a prompt in ChatGPT);
- Start a thread with the user and post a reply from OpenAI;
- Allow the user to reply in the thread, and enable the bot to keep track of the thread and assist the user.
Sounds nice? Let’s get coding!
First, let’s initialize the OpenAI library in our index.js file:
const { Configuration, OpenAIApi } = require("openai");

const configuration = new Configuration({
  apiKey: process.env.OPENAI_API_KEY,
});

const openai = new OpenAIApi(configuration);
Not much to comment on the above, except that at this point, we should also add the OpenAI API key to Heroku:
heroku config:set OPENAI_API_KEY=sk-<api-key> -a stark-brushlands-55983To subscribe to mentions of our bot, we will be using the app_mention event action:
app.event('app_mention', async ({ event, context, client, say }) => {
  // process our mention
});
The event parameter contains the message and other relevant data, such as the channel ID, thread information, and user who started the chat. The OpenAI API expects messages in the following format:
[
  {"role": "system", "content": "You are a helpful assistant."},
  {"role": "user", "content": "Who won the world series in 2020?"},
  {"role": "assistant", "content": "The Los Angeles Dodgers won the World Series in 2020."},
  {"role": "user", "content": "Where was it played?"}
]
The first message has a “system” role, defining our expectations and instructions for the AI. After that, it’s a dialog between the user and the AI assistant.
Since we don’t have an ongoing dialog yet, create an array with a single message element:
const messages = [{ user: event.user, text: event.text }];Later on we compare the user ID to our bot ID and based on that format the message either from the user or from the assistant (AI). Now, we can send the message to our sendAiRequest, which we will cover in the next steps.
const response = await sendAiRequest(messages, context.botUserId);The sendAiRequest function accepts our messages array and the bot user ID, and returns a response from the OpenAI API call, which we’ll send back to the user:
await say({
  channel: event.channel,
  thread_ts: event.ts,
  blocks: [
    {
      "type": "section",
      "text": {
        "type": "mrkdwn",
        "text": response,
      }
    }
  ]
});
In order for the response to be a part of our chat thread, we’re referencing the channel and thread in our say call:
channel: event.channel,
thread_ts: event.ts,
More on this can be found in the Slack documentation.
The full app_mention event looks like this:
app.event('app_mention', async ({ event, context, client, say }) => {
  const messages = [{ user: event.user, text: event.text }];
  const response = await sendAiRequest(messages, context.botUserId);

  await say({
    channel: event.channel,
    thread_ts: event.ts,
    blocks: [
      {
        "type": "section",
        "text": {
          "type": "mrkdwn",
          "text": response,
        }
      }
    ]
  });
});
And this is the sendAiRequest function:
const sendAiRequest = async (thread, botUserId) => {
  const mentionPattern = new RegExp(`<@${botUserId}>`, 'g');

  const messages = thread.map(message => {
    const role = message.user === botUserId ? "assistant" : "user";
    return { role, content: message.text.replace(mentionPattern, '').trim() };
  });
  messages.unshift({role: "system", content: "You are a Slack bot. Make sure to format your messages using mrkdwn syntax."})

  const completion = await openai.createChatCompletion({
    model: "gpt-3.5-turbo",
    messages: messages,
  });

  return completion.data.choices[0].message.content;
};
Because our chat with the bot is always initialized with a mention, we want to get rid of that. We will use a regular expression to get rid of the mentioned bot ID:
const mentionPattern = new RegExp(`<@${botUserId}>`, 'g');
text.replace(mentionPattern, '').trim();
Next, we need to form our messages array from the thread of chat messages we’ve just received. We will use the map() function to generate the array in the required format. And while we’re at it, we will also determine if this is a “user” or an “assistant” generated message. We do this by comparing the user ID to the bot ID, if they are equal – it’s a response from our bot:
const role = message.user === botUserId ? "assistant" : "user";Once the array is generated, we’ll add another “system” message to instruct the AI on how to handle our messages. I’ve kept it simple:
messages.unshift({role: "system", content: "You are a Slack bot. Make sure to format your messages using mrkdwn syntax."})Finally, we’re calling OpenAI and returning the response:
const completion = await openai.createChatCompletion({
  model: "gpt-3.5-turbo",
  messages: messages,
});

return completion.data.choices[0].message.content;
By now, if we deploy the code, our Slack bot will already be able to reply to our mentions. But we also need to make sure the bot is able to track our responses and reply back within the Slack message thread.
To do this, we will use the message event:
app.event('message', async ({ event, context, say }) => {
  // process messages
});
We will need to make sure that the event is a message in a channel, that it’s a thread reply, and is not sent by the bot itself. Let’s add this check to our event above:
if (event.channel_type !== 'channel' || !event.thread_ts || event.user === context.botUserId) {
  return;
}
The rest is similar to our app_mention event code above with one exception – we first need to fetch the chat thread history.
const thread = await app.client.conversations.replies({
  channel: event.channel,
  ts: event.thread_ts,
});
The thread.messages property will contain the array with all the thread messages. Once again, we are going to send that to the OpenAI API and respond to the user:
const response = await sendAiRequest(thread.messages, context.botUserId);

await say({
  ...
});
The full event code looks like this:
app.event('message', async ({ event, context, say }) => {
  if (event.channel_type !== 'channel' || !event.thread_ts || event.user === context.botUserId) {
    return;
  }

  const thread = await app.client.conversations.replies({
    channel: event.channel,
    ts: event.thread_ts,
  });

  const response = await sendAiRequest(thread.messages, context.botUserId);

  await say({
    channel: event.channel,
    thread_ts: event.thread_ts,
    blocks: [
      {
        "type": "section",
        "text": {
          "type": "mrkdwn",
          "text": response,
        }
      }
    ]
  });
});
That’s it. We can now commit our code to git and deploy:
git add -A
git commit -m "Add bot code"
git push
Testing
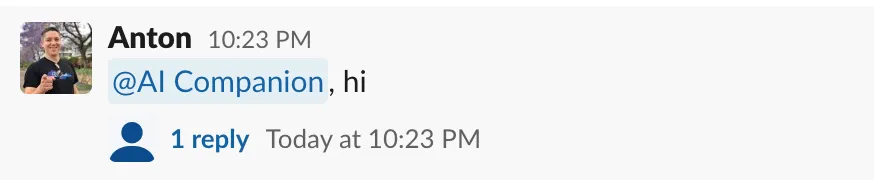
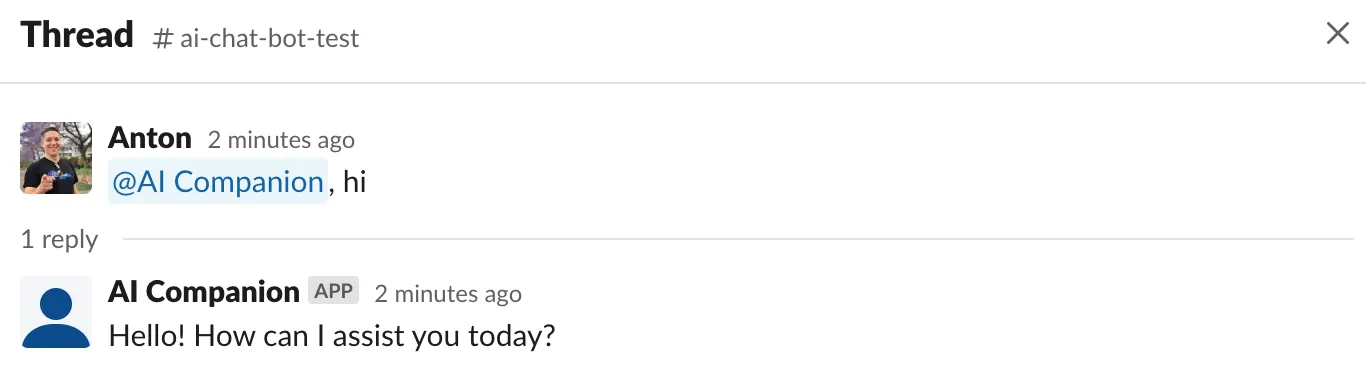
Let’s test it out in Slack. The app should now appear under the Apps section in Slack. Let’s say hi:
And, within seconds, I already receive a response:
Let’s ask how the bot is doing:
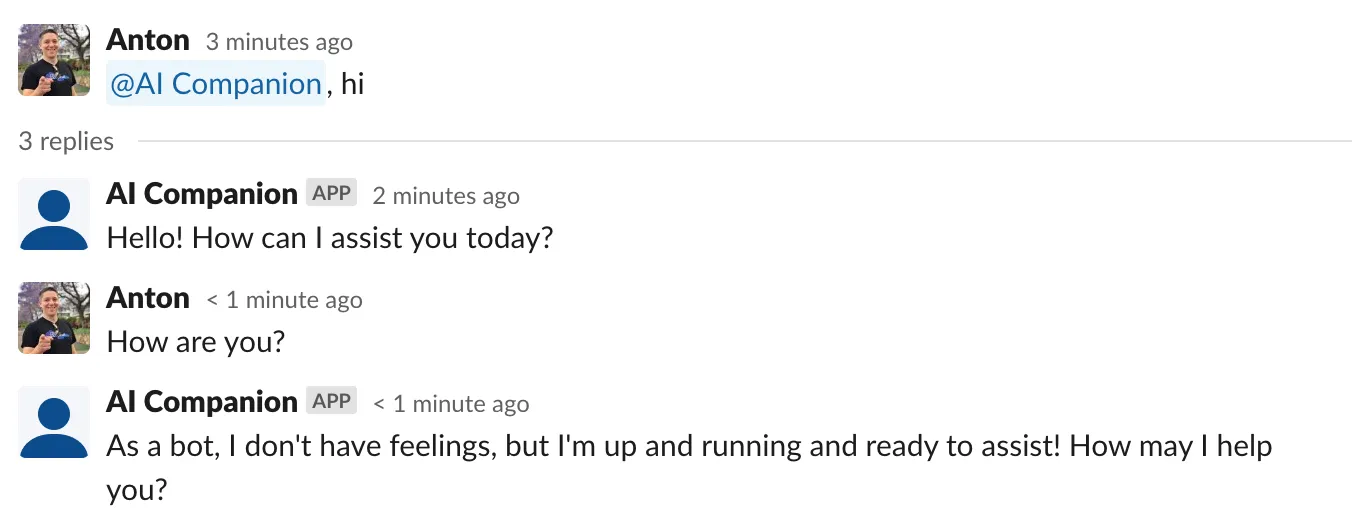
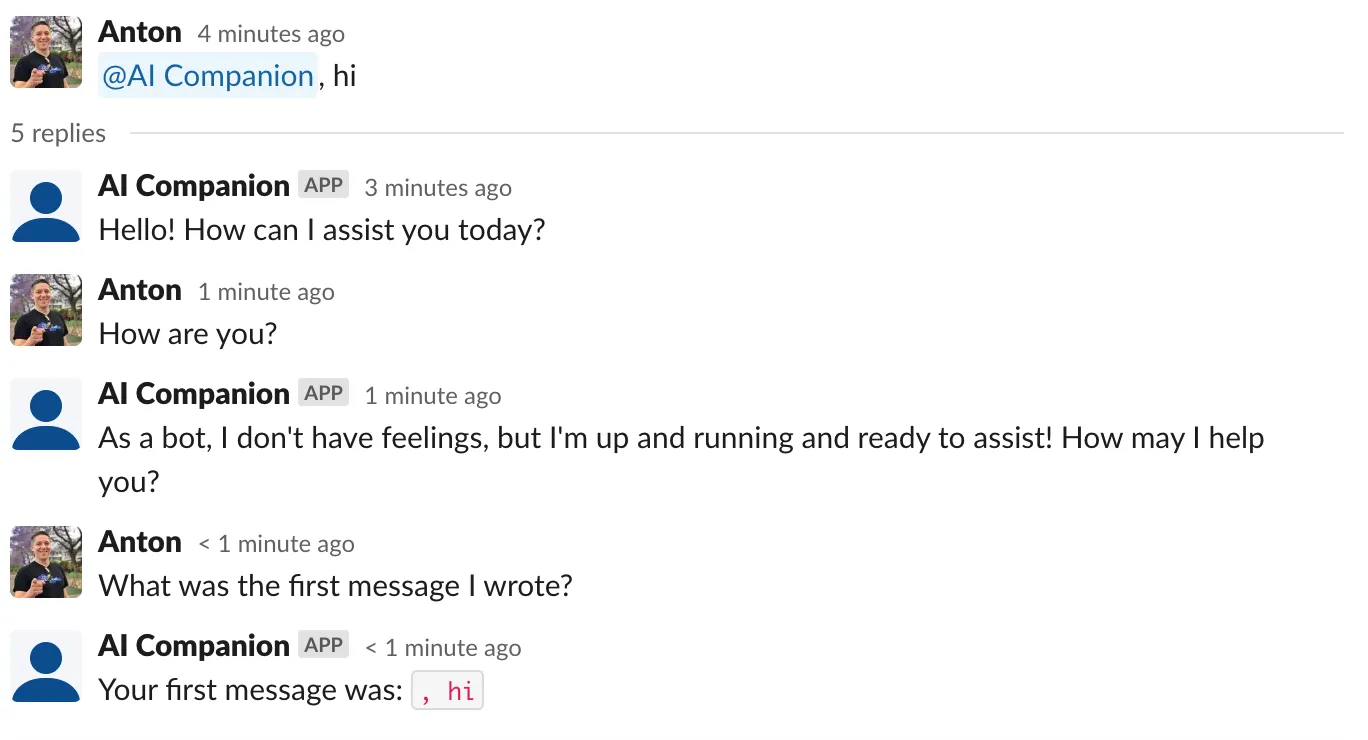
Again, a response within seconds. But can it actually track our conversations? Let’s ask and see:
Conclusion
In this article, we have delved into various aspects of setting up a Slack app and integrating it with OpenAI. While we have only skimmed the surface of this expansive topic, our exploration has shed light on the vast potential of AI in streamlining day-to-day tasks and enhancing productivity. I hope this tutorial taught you something new.
Back to blog